Having been given a somewhat unexpected day off today, I decided tonight was a good time to make my foray into exploring the Cricut Cake machine I got for Christmas. I originally thought I would just go ahead and chronicle my adventure on Facebook, then realized that would be way too long, hence the first update in nearly a year on my poor, neglected little blog.
First and foremost, the cast of characters:
 That lovely retro red thing in the middle is my Cricut Cake Mini. It's about the size of your average printer, so I've no idea how big the full size is. But it's certainly big enough for my purposes--it can cut up to 6" wide and 12" long. I think the full-sized version does double that in width and length, so it would be nice for bigger jobs or in a production bakery. So, maybe in the future!
Also needed: cornstarch, shortening, an offset spatula, fondant (that foil package), toothpicks, the QuickStart guide, a nice little paring knife, and your cartridge and its corresponding book (more on that later). Today's cartridge (the one that comes included with the machine): Cake Basics!
 The machine once it's opened. In the middle-right of the machine there (the half-oval shape) is the cartridge. There's tons of them, and they're all cross-compatible. Meaning: I can get a cartridge intended for one of the paper cutting machines, and it'll work just fine on my Cricut Cake. Thanks to Mom and Kristina for that bit of knowledge!
Each cartridge has a set of images/phrases/fonts it can cut. You just pop the cartridge in once the machine is turned on, and it loads in that info. (On a related side note: when you turn the machine on, try not to have your face right next to it--it's a bit louder than you might expect!)
 This is the keypad overlay. Each cartridge comes with it's own corresponding keypad overlay, which shows you (most of) the various images you can get with that cartridge.
 This is the keypad overlay. Each cartridge comes with it's own corresponding keypad overlay, which shows you (most of) the various images you can get with that cartridge.
  Here's a close-up of some of the fancier-looking images. Let's give one a try!
 I push the button for my image, and the display notes what I've chosen. Beneath that, you have three more bits of info. The bars on the left indicate the speed of your cutting. My understanding is that slower is better (at least to start)--less tearing of your material. The bars on the right indicate the pressure being used. Obviously for something thicker/more dense, you want to up the pressure. And on the far right is the setting for the size of your image.
The front of the machine has silver wheels to adjust each of these.
 And here's the cutting mat included with the machine, and the fondant I've rolled out for my first try. Cricut tells you to apply shortening liberally, so I went ahead and did that. I figure it's to both keep it from sticking when you want to take it off, but also to keep it from moving while the machine is cutting it.
 So, I tried a cut:
 ...aaaand, not so much. Granted, the image is a bit complex. I figure my fondant was too thick, and my speed was too high for this particular shape. So I re-rolled the fondant thinner, and picked a slightly different shape to try.
The machine while it's cutting. The white housing on the right there has the cutting blade at the very bottom. It's a tiny little thing that rotates all around.

Ahem. While the machine cuts, can we please take a moment to admire my fancy schmancy new paring knife? It's part of a lovely 15-piece J.A. Henckels Classic set that I got for Christmas/my birthday. They're pricey little suckers, but so nice and sharp, and just the right amount of heft in my hand. I heart them. So much that I fully plan to hand-wash them as directed, rather than tossing them in my dishwasher.
OK, back to the Cricut.
 Hooray--success! I personally don't understand the flower in the middle of this image, but the joy is that you don't have to use it since it's on its own there. I could toss it out and replace it with something else, if I so desired.
So, excited by my success, I decide to get a bit more adventurous and discover you can input multiple, different images to print at the same time (one after another, that is). Let's see how that turned out.
 The machine finishing up its cut here. Once it's done, you just hit a button and the roller bar gently ejects the mat from the machine.
 I got even more adventurous after it finished the first cut (the two images on the top) and decided to play around with the ability to move the starting point of the blade. It has 8 directions you can move it in, so I just bumped it to the left so the other images would cut right below the first two.
I enjoy the scroll-y shapes--always have. The butterfly is cute, but delicate. And the cupcake had some issues with where the machine attempted to cut some slits for the wrapper's folds. But here's where those toothpicks come in handy in helping clean out those crevices. Cricut makes a set of tools especially for the Cricut Cake, and one looks like (basically) a fancy metal toothpick with a handle. So--for now--I work with what I have.
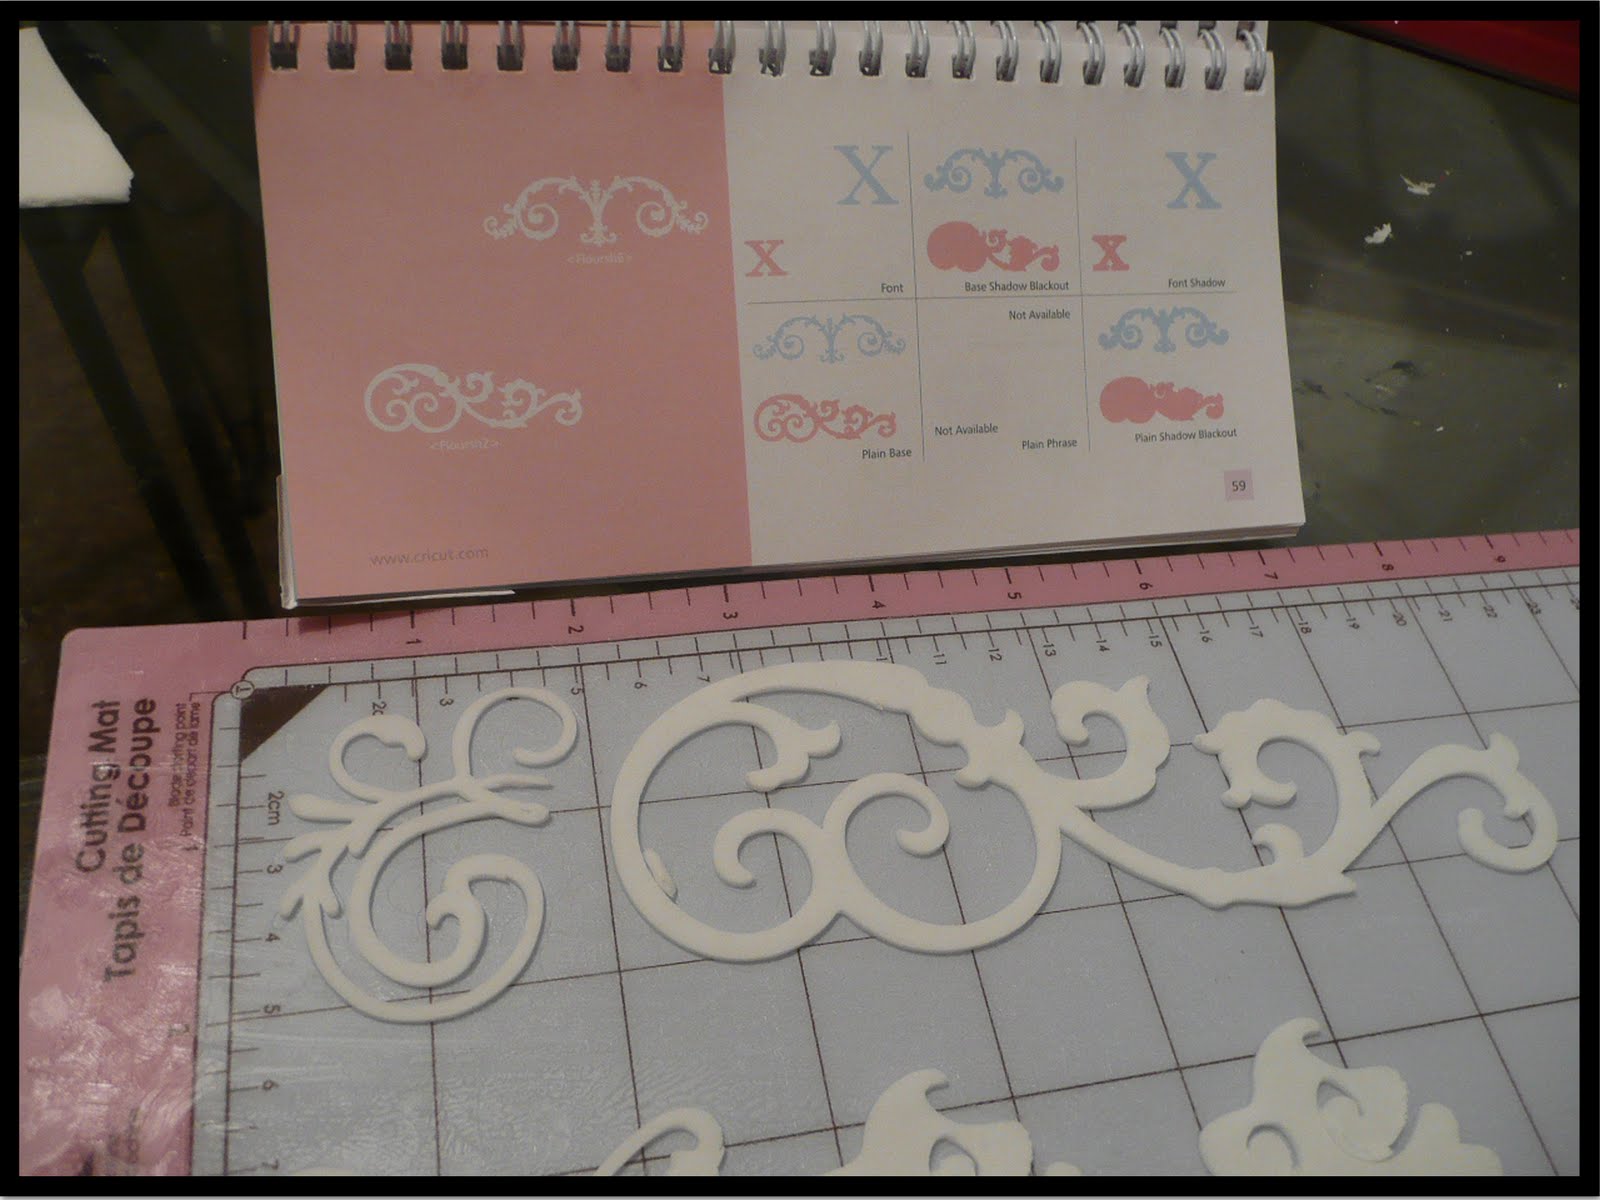 Here's the book that comes with the cartridge. What it does is show you each and every image the cartridge has. AND it shows you what the different "creative feature" options will do to said image. For example, you can choose to have a "filled in shadow" of your image, which will result in something like the bottom left hand corner there, if you can see it. Basically, you could place that behind the one I cut out, and have a spiffy layered look.
 The creative features are also how you access the fonts and phrases that have come with the cartridge. And here's where this little spiral-bound notebook becomes your Cricut Cake Bible--these phrases and fonts are NOT on the keyboard overlay (I'll wait here while you scroll back up to the keyboard image to verify this). So unless you have a really good memory, you need the book to know which phrases or letters are associated with which keys.
  Here I've decided to go with the two versions of "Happy Birthday" included in my cartridge. This is them fresh out of the machine and not cleaned up.
 In the middle of cleaning them up. I started to notice my fondant was cracking and, in general, no longer cooperating. This is fondant I bought back in August, used part of, and have had stored away since, so already it wasn't the freshest stuff. And then--by this point--I'd re-kneaded and re-rolled it 4 or 5 times, so it had lost most of its elasticity.
 So that's why these ended up looking a little raggedy. At least, I hope that's why. It may also help to do them bigger--with them as small as I did (2" each), a lot of the connections and details were just too small to maintain, especially with fondant that was cracking and whatnot.
And that was the end of my first playtime with my Cricut Cake! I figured I should probably quite before my fondant's penchant for cracking and tearing started getting me super-frustrated.
The good news is that the Hobby Lobby has a 40% off coupon this week, so getting some fresh is no problem. I'll have to make 2 trips, as I also want a pasta rolling machine (they have them in the clay-working aisle). Mom suggested it, and I think it's probably a good idea to help me get the fondant rolled out uniformly--as thin as it needs to be--quickest and easiest.
The Cricut cartridges and accessories are also on sale for 30% off--I'm going to try to resist, but we'll see how that goes. In my research, I've discovered that with a different blade, the Cricut Cake CAN be used for paper, so I'm intrigued by that. Especially since there is also a cartridge that cuts lovely cupcake wrappers (do a Google search for filigree cupcake wrappers for an idea). It would be cool to be able to do those at home, especially since they're so pricey! If I'm feeling particularly entrepreneurial, I could sell them on Etsy!
If nothing else, a few additional cutting mats and replacement blades wouldn't be a bad idea. The mat isn't self-healing, so it carries a little imprint of the cuts you make on it. It'll last awhile, but certainly not forever, and replacements are relatively inexpensive. And I've read that, if you work with different fondant colors, it helps to have a different mat for the different colors. Or at least one for darks, one for lights, and one for white to avoid bits of trapped fondant contaminating one another.
So, next time, I think it'll be time for a different cartridge--I'm thinking the Martha Stewart Elegant Cakes one. It's right up my alley. If/when that happens, pictures and a re-cap will follow.
Goodnight all!